Thursday, 18 February 2010

DMAybe

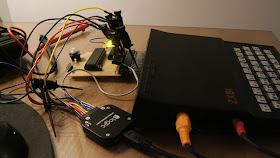
This little cutie is the dogs dinner pudding.


I've wired and programmed the controller to assert /BUSRQ, wait for /BUSAK and then have its wicked wicked way with the address, data and /WR lines. Thus effecting some access to memory directly for the uC.

It's not enough unfortunately. I'd forgotten that my internal 32K expansion requires /MREQ to be asserted in order to enable the memory decoder. Which would explain why it doesn't work :)

That and the phantom blips on the /RD line that I'm seeing.


I don't know yet whether this is the ZX81's ULA interfering or some pedigree chum-based effect that would go away if I soldered the thing more carefully..!

I'm glad I've built a prototype - even if it is kind of awful.

I'm off to do some more soldering and a bit of firmware tweaking. Be right back.

Sunday, 14 February 2010

Laid out cold

Here is the manually routed board according to the schematic posted last week.


I've learned a lot in the past few weeks. This layout is the result of having the patience to rip it up and start again. Multiple times. I think this is the 4th iteration so far.

I've broken a few rules along the way, I'm sure, but having looked at the Gerber files in a suitable viewer I think, at least electrically, it might work. When I say work I mean not go on fire. There are no bits overlapping when they shouldn't, no vias encroaching uncomfortably on one another's personal space, and no wires with insufficient clearance.

Having two layers to work on at board-house resolution makes things significantly easier than working at home-brew resolution on single-side designs. Sticking to a few rules which at first seemed punitive and arbitrary has produced a good result. One layer has tracks running horizontally, the other has them vertical. It's hard to describe how this makes things easier but once you start routing it surely does. Some board houses restrict the number of vias you can use, but the one I intend to use has no limit.

I find this activity strangely relaxing. If I knew what a zen-like state was then I think this may approach that. It's rare these days that I get into any kind of zone but taking time out to sit with Eagle for an hour gets me really close.

I finished routing this board despite the fact that I decided to use a different IO expander halfway through due to the fact that:
  • MAX6956 are nearly £10 each to buy...
  • ...when you can actually source them from somewhere.
The MAX has some nice features, not merely the fact that the IO pins line up reasonably neatly with the address lines on the RAM chip. And the fact I've used it before helps too.

I have aligned myself with the Microchip MCP23x17. It's a 16 port expander with either I2C or SPI interfaces. If the SPI version can live peacefully with the MMC interface then I'll choose that - it can be driven faster than the I2C version. There will be times when I'll be reading from MMC and simultaneously driving address lines via the expander. The MMC transfers have to happen in a stream and unless I can cache an entire sector's worth of data in one go then the actions will have to be interleaved. If that's not possible then I'll be looking out for a bit-banged I2C implementation. The I2C and SPI pins and registers are shared on the PIC.

Of course I'll have to try all this out before I commit to FR4. This is the dogs-dinner prototype.


There's not going to be any MMC on there for the moment - the idea is that I'll be using the board to try some elementary DMA by driving the address and data lines on the ZX81. Once I get that working I'll turn my attention to trying simultaneous expander and card access. That can be done on a breadboard though.
Monday, 8 February 2010

ZX81 MMC Redux

I like a good faff and I suspect you do too. Don't be ashamed. We all do it. However I've done rather too much of it recently and I'm going a little blind.

I want one of these:


Eagle schematic here (you might need to right-click-save-as)

So I'm going to have to bite the bullet and make one. I've decided that the simplicity of bit-banging is all very well and good but sometimes ambition should be allowed free reign.

With that in mind may I present 'The ZX81MMCRAMANDIO Board'!!

Ahem I'll be sacking the marketing man later.

It's a combined 32K RAM, SD/MMC and IO interface for a ZX81. 32K of static ram from 8K-40K will give true hires capability. A jumper will allow the on-board RAM to be disabled on those machines already internally expanded. It will be able to perform some basic DMA and be able to fill the machine's RAM with code and data from the SD/MMC card. This eliminates the need for loading of firmware from cassette or having external ROM.

The Z80 processor has a rather endearing ability to hold itself off the bus when requested. I'll be using this facility to effect the DMA. Simply assert the BUSRQ line and the Z80 lifts its legs obligingly from the circuit. At this point the uC will use some chip or other (a MAX6965 in this first design but I'll have to change this - too expensive) to drive the address lines of the RAM whilst jeffing program data into its bytey cells. The ZX81 will need to be in FAST mode (ha!) whilst this in progress in order that the ULA be quieted and diverted from its usual NMI generation duties which would spoil things rather.

This is a project I've been promising for way too long now and finally I think it's time to commit a design to PCB for manufacture. Follow me if you will. I think it'll be rather fun :)

I'll publish all my materials along the way if you want to play too. As I'm planning to make some of these to sell I'm afraid I'll have to assert some rights though - these ones look quite nice.

Creative Commons License
This work is licensed under a Creative Commons Attribution-Noncommercial 2.5 Generic License.

Feel free to remix, rework or improve, doodle dawdle or derive. Comments welcomed.

TTFN!